Terminology
- Tubeless ready: This can mean different things, but with tires, it means that the tire can be used as a tubeless tire, but is not inherently airtight, and needs to be used with sealant. Some manufacturers use “TLR” or “TR” in their tire nomenclature for "tubeless ready”
- Tubeless: when used in contrast to “tubeless ready,” this is a tire that could theoretically be used without sealant (but probably would be used with sealant regardless), since it has an airtight layer. Some manufactures use “TL” in their tire nomenclature for “tubeless.” Uncommon.
- Rim tape: Contributes to an airtight chamber by sealing the valve and spoke holes. This is not ordinary rim tape used with innertubes. Often is kapton tape.
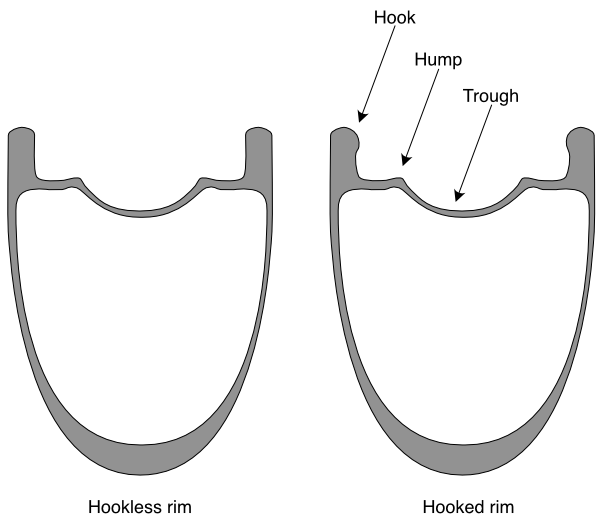
- Tubeless Straight Side (TSS)/Hookless - Rims built without bead hooks to help latch the tyre to the rim on inflation. TSS/Hookless rims have strict tyre/rim compatibilities and max pressures for inflation. It’s necessary to refer to the manufacturer’s documentation carefully.
- Hooked rim: A rim with hooks, the same as found on traditional clincher rims.
- Hook: Like traditional clincher rims, these are hooks (aka crotchets) at the top of the sidewalls. Not all tubeless rims have hooks.
- Hump: This is a protrusion on the rim bed that locks the bead against the sidewall, and is a critical part of high-pressure tubeless systems.
- Trough: This is the low spot in the center of the rim. Because it has a smaller diameter than the rest of the rim, it can be useful when mounting tight-fitting tires to move as much of the bead into the trough as possible, in order to create some slack for getting the last bit of bead on.
- Sealant: A viscous fluid, often liquid latex, that escapes through a puncture and solidifies as it escapes to seal small punctures.
- Plug: A rubbery insert used to plug punctures that are too large for sealant to close. The most typical type of plug is called a “bacon strip,” and is inserted into the puncture using a forked spike. There are alternative types of plugs from Dynaplug and Stan’s.
- Blaster: An inflation tool that provides a rapid rush of air into the tire. It is a reservoir that is filled with air, which can then be discharged into the tire. Sometimes built into floor pumps.
Pros and cons & caveats
The pros of tubeless tires are:
- Lower weight: no innertubes
- Small punctures seal themselves (though sealant can be added to innertubes as well)
- Lower pressures are possible without the risk of pinch flats
- Lower rolling resistance (though the difference between a tubeless tire and the same with a latex innertube is a fraction of a watt)
Road tubeless is a relatively recent technology: it was still exotic as recently as 2017, at which time it was not used in the pro peloton. Standards evolved quickly to iron out early problems like mounting difficulties and tire/rim compatibility, but equipment from the early period may be more difficult to work with.
Tubeless systems in general require strict compliance with their specifications:
- A rim of a given inner width will have a certain range of tire widths that are compatible with it.
- A tire will have a certain maximum pressure that it is rated for, and this may be slightly lower on hookless rims.
There have been cases of out-of-spec tires or excessive pressures causing the tire to blow off the rim. It is a big risk and should be taken seriously.
Tires need to have sealant periodically replenished, every 3 months or so (depending on the sealant).
A puncture can result in a significant spray of sealant all over the back of your bike, your kit and the person riding behind you. Some sealants are difficult to clean off your bike and out of your kit in the laundry.
Equipment & equipment selection
The equipment you’ll need, at a minimum, is:
- Wheels with tubeless-ready rims (having the rim bed design shown above).
- Tubeless-ready tires
- Tubeless rim tape (not needed on rims that have no spoke-hole openings in the rim bed)
- Tubeless valves. These are typically presta valves, but there are a number of alternative valve designs aimed at making tubeless wheels easier to live with.
- Sealant
All of this is pretty obvious. Other less obvious tools you might want:
- A blaster or air compressor to pop the tire into place
- A tire jack to help get hard-to-fit tires over the rim wall
- A valve-core wrench
- A sealant injector
Some tubeless/tubeless-ready tires are not rated for use with hookless rims.
Rim tape should be wider than your rim’s internal width so that it can cover the rim bed following the contours and reach right up to the rim walls. Check with the rim manufacturer for their recommended tape width, but (for example) a rim with 21-mm internal width will probably take 25-mm rim tape. WTB recommends internal width + 4 mm in all cases.
As mentioned above, it’s important to pick a tire with a width that is compatible with your rim’s internal width (measured wall-to-wall, under the hooks if present). Following is the ETRTO’s rim/tire width compatibility chart. Some tire manufacturers have their own compatibility charts that are different.
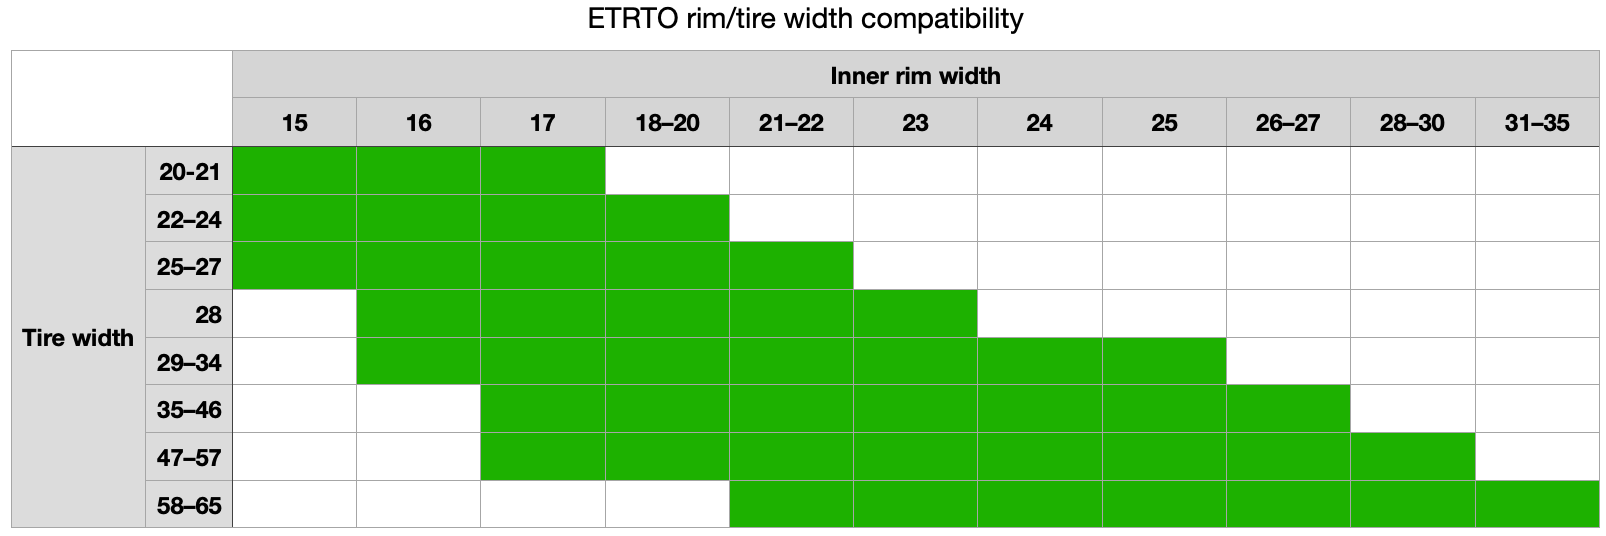
Another consideration, not unique to tubeless setups, is that if you choose a tire right at the limit of your frame’s compatibility, its effective width could increase when mounted to a relatively wide rim, creating fit problems.
Valves need to have a stem with the right length for your rim depth.
Initial setup
If you are using wheels that were previously set up with innertubes, take the tires, tubes, and rim tape off. Clean away any adhesive that may remain on the rim bed. Make sure the rim interior is clean before going any further.
Lay down tubeless rim tape. Slick it down against the rim bed as you go to remove air bubbles, and keep it extremely taut. Do not start or finish at the valve hole. Some people prefer two windings of tape, others put down only one with some overlap—at least 10 cm.
Locate the valve hole and make an opening in the tape for the valve. There are a couple of popular methods:
- Cut an “X” with a very sharp knife
- Heat up the threaded end of an old spoke and poke it through.
Install the valve. The valve will typically have a conical or semicylindrical gasket that fits against the rim bed, and a nut (possibly with an O-ring) that secures the valve stem against the inner diameter of the rim.
Install the tire. Begin by getting one bead all the way on and pushed into the trough. Work the opposite bead on, moving it into the trough as you go. The last ~20 cm can be really difficult. This is where a tire jack can come in handy.
There are two points in the process when you can add the sealant: When the tire is mostly mounted, or after the tire has been fully seated. The first option saves a little time, the second seems more foolproof. If adding sealant with the tire mostly mounted, make sure there’s enough unmounted tire for you to pour sealant in. Rotate that open spot to the bottom, pour in the sealant, rotate the wheel 180°, and finish mounting the tire. We’ll come back to the other method below.
The amount of sealant to use depends on your tire’s volume and the sealant. The sealant manufacturer will publish a guide, but for a 28-mm 700C tire, it will probably be 20–60 ml in each tire.
After getting the tire beads all the way on, seat the tire by inflating it. This pops the beads over the humps so they sit against the rim walls. If you’re lucky, you can do this with a track pump. It helps to remove the valve core from the stem to improve airflow, though it does mean you’ll need to let the tire deflate to install the valve core and then reinflate it. Sometimes, when you’re not lucky, the air you are pumping in escapes quickly between the tire and rim, and you’ll need an air compressor or blaster to get a very rapid rush of air into the tire. You will know when the beads pop into place because they will make sharp popping sounds.
Assuming you removed the valve core before, remove the pump and let the air out. The beads should stay in place—it takes a fair amount of force to displace them.
If you did not add sealant before, do that now. Fill a sealant injector with sealant and slide its tube over the valve stem with the valve core removed. Some sealant comes in a bottle with a cap and tube that you can use as a makeshift injector, but it is hard to control the amount of sealant you add. Rotate the wheel so the valve is pointing up and inject. Remove the injector, replace the valve stem, and reinflate the tire.
Spin the wheel around to coat the interior, and take the bike for a spin to more thoroughly coat the interior.
There are some tubeless-ready tires with very thin walls that are somewhat porous, and sealant can weep out initially. These may require sealant top-ups after a week or so, until the weeping stops and the tire is fully sealed.
Repairing Punctures on the go
A puncture that is too big for liquid sealant may be fixable using a plug. You should know within a few seconds that the sealant is not doing its job. If this happens, it is a good idea to act quickly to plug the tire, while there is still some pressure in it so that it holds its shape. So it helps to have a plug preloaded and somewhere easily accessible. Dynaplug, for example, includes a bottle-cage mount with some of their plug carriers; there are also plug carriers that take the place of a bar-end cover.
To plug the tire, jab the puncture with the loaded plug carrier and withdraw it. There are videos showing this process online. The plug will leave a tail sticking out of the tire, which you can and should trim off.
People have successfully used two plugs when a puncture is too big for one to fill, but longer cuts will probably require booting the tire and inserting an innertube. People have applied regular innertube patches to the insides of tubeless tires, but it may not be possible to re-seat the tire with a mini pump out on the road, so innertubes it is. A CO2 cartridge probably would be able to re-seat the tire though.
Maintenance
Living with tubeless tires does not require much in the way of day-to-day maintenance.
Valve cores can get clogged with sealant. They are commodity items and can easily be replaced, but to reduce clogging, there are a couple of good practices:
- Store the bike with the valves in the lower halves of the wheels so any sealant in them drains out.
- Pump up the tires with the valve approximately in the 4:00 position. This lets any sealant drain out while avoiding creating any bubbles in the pool of sealant at the bottom of the tire.
Your sealant will have an expected lifespan after which it needs to be replenished. When you top it off, write that date on the sidewall of the tire (or wherever you keep your bike’s maintenance information).
Before that lifespan has elapsed, remove the valve core and stick a dipstick through the valve stem into the pool of sealant at the bottom of the tire to see how much is left, and replenish if needed.
Sealant can dry into a solid blob inside the tire. There’s no rule for this, but it doesn’t hurt to periodically remove the tire and check the condition in there. Sealant can also form ‘spiderwebs’ on the inner surface of the tire, which is normal. These can be removed, and a “glue eraser” makes it easier, but it doesn’t hurt to leave them. When removing the tire, be prepared for any liquid sealant still in there to make a mess, and clean off the inside of the rim before remounting the tire.
Q&A
Q: Can I use innertubes with a tubeless setup?
A: Yes, with some caveats. If you have hookless rims, you need to use tubeless or tubeless-ready tires with them, as they fit the rim differently than traditional clincher tires. Tubeless tires are typically more expensive and heavier than clincher tires. As a backup measure, though, it is normal to use innertubes (perhaps together with a tire boot) when neither sealant nor plugs can fix a puncture.
Q: Can I use traditional clincher tires with tubeless rims?
A: Yes, but only if they are hooked rims, and only if you also use innertubes.
Q: Can I use tubeless tires with clincher rims?
A: Yes, but only if you also use innertubes. Because tubeless tires are typically heavier and more expensive than clincher tires, the only reason to do this is if you can’t find clincher tires.
Q: Can I set up traditional clincher rims and tires as tubeless?
A: No. Although people have done this with mountain bikes, the higher pressures involved in road tubeless (which is what this document is about) make this impossible.
Q: Tubeless sounds like a lot of trouble.
A: That’s a comment, not a question. You don’t need to switch to tubeless. It’s not right for every situation. Clinchers aren’t going away any time soon.
Brands & Products
Plugs
- Bacon strips are commodity items and there’s no reason to choose one brand over another.
- Dynaplug makes a highly regarded line of plugs.
- Stan’s makes an alternative plug called a Dart.
Sealants
There are many brands of sealant, but it seems there are two overwhelmingly popular options: Orange Seal and Stan’s. Orange Seal offers standard and endurance varieties, with the endurance supposedly lasting more time between refills, and Stan’s offers standard and “race day” varieties, with race day lasting less time between refills, but supposedly more aggressive sealing performance.
Rim tapes
- Rim tapes that are glossy with no printing, often in beige, yellow, or brick color, are all kapton tape, and there’s no quality difference between them, so no reason to go with one brand or another.
Pumps & blasters
- DIY “ghetto blaster”: there are numerous guides online for building your own blaster, often using an old soda bottle or a second wheel as the air reservoir.
- Milkit has a line of tubeless accessories including a blaster that is basically a custom cap for a standard 1-liter aluminum bottle. This is one of the cheaper commercially available options.
Sealant injectors
Valves
For the most part, there’s not a lot of difference between valves, and they are generally offered by companies that sell other tubeless supplies, but there are some interesting alternative valves out there.
- 76 Projects valve. Claims improved airflow, resistance to clogging. Works with standard Presta pumps.
- Reserve Fillmore. Also claims improved airflow, resistance to clogging, works with standard Presta pumps.
- Speaking only for myself, I’ve had trouble getting a screw-on Lezyne pump head to make a good seal with these.
- Muc-off Big Bore valve. Again, claims improved airflow and has no core to clog. Uses a manual valve to open/close airflow. Works with Schraeder pumps.
- Clik valve. Not tubeless-specific. This can replace a standard presta valve core and claims improved airflow and greater ease of use. Works with a special Clik pump head that just (ahem) clicks into place.
This is a wiki post, so you can edit it.