I am planning a bike workshop (non commercial) in the house.
I am looking at workbenches and workshop cabinets but it is really hard to find reviews of these.
I found this: Workbenches for professionals | Kraftmeister for example but no actual reviews.
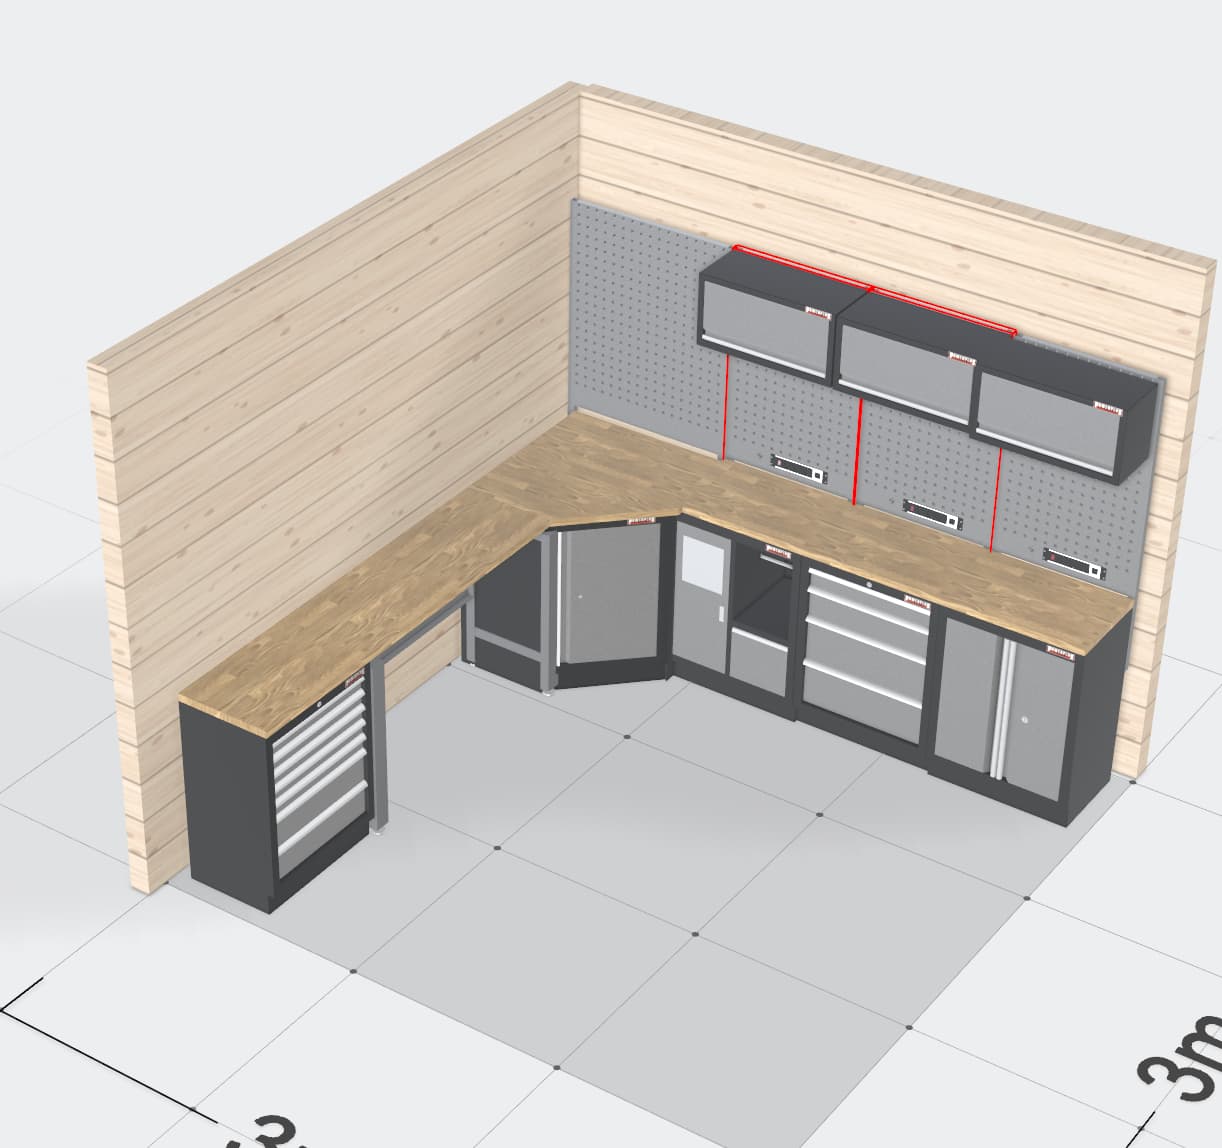
The room is 3m by 3m and with a planning tool I came up with more or less this design below.
The wall without the wall panels has windows.
For people with actual workshops did I miss something that makes such a design a bad idea?
It would be amazing if I could also make it work for waxing XC skis, but since that produces so much dust and mess happy to keep it separate.
Glancing at the product it looks well built with lot of options. You’ve probably selected the drawers and cabinets with the tools and parts you need to store in mind. A few thoughts:
How deep is the counter top? They seem shallow in the drawing. I often wish my bench was a bit deeper when I’m messing with a wheel.
Reconsider the corner. It adds some flexibility but the wall behind and the back corner may be where things get shoved to gather dust.
Plan for a vice.
Good luck and share how it turns out. I’ve been thinking about reworking my ad hoc set up so it is a good conversation to have.
I do skis and bikes in my basement workshop, remember to give the countertop enough overhang for the ski vise clamps. I made mine too skinny and the drawer fronts also collide. A buddy saw my shoddy work and built his bench with a section of the counter that was wider for about 1m specifically for the ski vises.
I’m posting the same thing as Bryan_Sechrist. The counter tops appear shallow. A truing stand would have to go in the corner where it’s deep or you’d have to use a base like the Park TSB-2.2 or TSB-4.2 and let it sit on the counter diagonally when in use. You can tuck it back when not in use. My TS-4 at work is mounted to the bench, but the benches aren’t against a wall so the wheel can hang out over the rear of the bench. My TS-4.2 at home sits on a TSB-4.2 and the TSB-4.2 is mounted on a piece of 3/4” birch plywood that has feet, handles, rounded over edges and a couple coats of poly. I slide it back when not in use, and slide forward when I need it.
You’re gonna need a vise. Preferably fixed base, not swivel, and they often hang way out over the edge of the counter. If the vise lines up with your handlebars it can be hard to squeeze by. I have my 5” Athol vise (90 pounds) on my bench at work and, unfortunately it lines up perfectly with the right side handlebar of a bike in the stand. There’s not much room to squeeze by with a modern mtb (wide bars) in the stand. It’s pretty annoying and it hurts when I smash my elbow on it.
I prefer my workflow to move left to right when I’m facing the bench. Vise on the left, truing stand on the right. It allows the sequence of tunes and builds to flow left to right. Remove wheels from bike, use vise if necessary to adjust hubs, move right to use truing stand. It’s easier to figure out what’s done or not done after I get interrupted and lose my place.
You should also locate the tools near the part of the bike where they’ll be used. Tools for headset, stem, handlebars should be near the left hand side. Bottom bracket, crank, pedal and chain tools near the center. Cassette and derailleur tools near the right hand side. Less steps to get the tool you need.
I see pegboard, but you should also try to make everything else as modular as possible. Your tool collection will grow. Your skills will improve. The bikes change. You’ll end up re-arranging the tools from time to time to improve workflow and correct any oversights from the initial design and it’d be a shame if you had holes in the countertop, walls, cabinets, etc.
Good lighting is extremely important. You might want some under-cabinet lights below the upper cabinets so maybe plan for electrical power there.
Good comments on work flow. In addition to the tool collection growing, the parts collection will too. Its hard to toss stuff that may have future use for an emergency fix or that “does anybody have…” social media post. Most of my work is simple maintenance, I leave the heavy lifting for the crew at my favorite shop. Can’t imagine what would pile up if I was doing more.
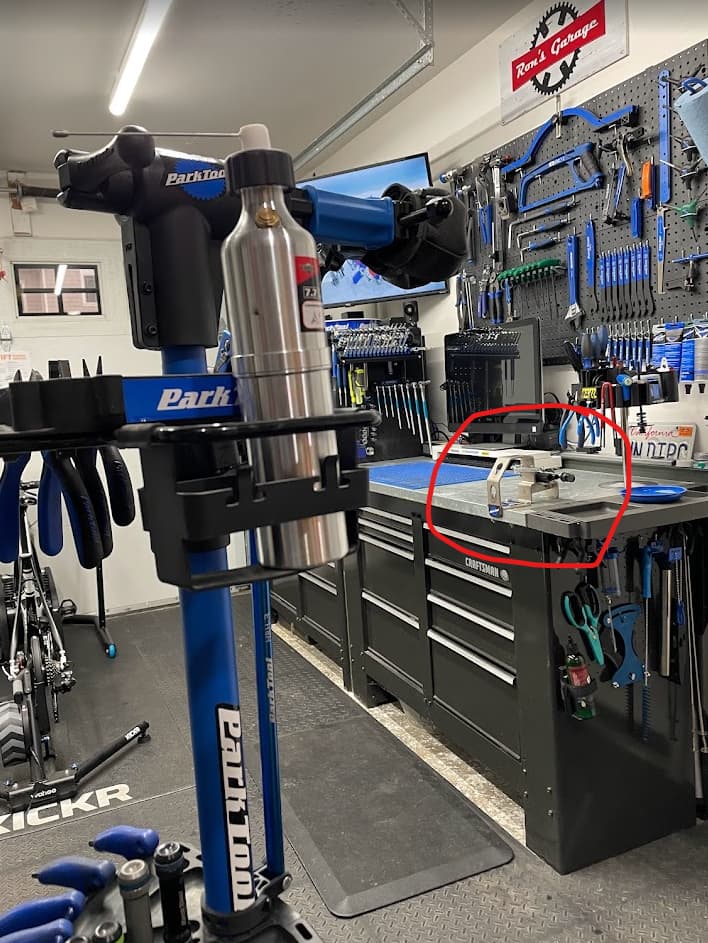
I personally like the corner setup with the bike stand centrally positioned. It’s convenient to have two work surfaces next to the bike. I agree with the need for a vise, as well as good lighting, but I would also add a spot for one of the Park Tool wheel holders. I use mine all the time for everything from seating tubeless tires to just drying/cleaning wheels after a wash. Mine’s circled in the photo below.
Came here to say exactly this. I only have the upright one at the moment but I use it all the time. I’ll upgrade to the 3-position one pictured as soon as I get around to putting in my more permanent full-length workbench…
Thanks a lot this is extremely helpful.
It will be a couple of months before I can actually get started setting this up.
I will do my best to get this updated then.
Current planned worktop depth 65 cm (if I go with the kraftmeister pro thing)
PRS 26 will be in the middle of the room.
A vise is definitely planned, but I am not yet sure where to place it. The current uses would be
getting the “definitely not stuck” dt swiss star ratchet out …
shock service
dropper post service
saw guide
Silca chain waxing setup should be on the worktop
Possibly a 3d printer too. But need to figure that one out still.
A charging station would be needed
Makita battery
4 battery sram axs one
lights, core sensor, wahoo, …
A wheel truing stand is definitely planned, but no experience with that yet.
I don’t drink beer so no fridge for that but icecream should be in the room next to it!
The park tool wheel holder looks like a great idea. I think starting by putting it in the vise and if I use it a lot finding a fixed place to mount it would be a great idea.
I believe this setup should be able to hold most of what I have with room to grow. The majority of my tools live in either the park tool BX 2.2, a shelf in the basement or one of 2 45L ikea boxes (bleed kits in one, rarely used stuff like hacksaw, crown race, star nut tools, … in the other).
There are of course multiple ikea boxes with bike parts too, but they have a space in a closet as I don’t ned them that often.
I like the idea of creating a way to be able to clamp the ski holders to the worktop, but that might require using the side without the vise. For the XC Skiing setup I currently have the toko foldable table with the holder for the ski’s (and the storage holders at the back). This is quite mobile but not aesthetically appealing.
Light cannot be overstated, ceiling and under those top drawers if possible.
3D printer takes quite a lot of room (printer, filaments, filament dryer/ams etc), and should be kept pretty clean. Also most of the filament types are not healthy, or even dangerous when printing. If possible I would keep it in different room. But strong recommendation to get one, its so useful in many ways, especially when setting up pegboard and cabinets.
One thing I didn’t account for was room for shop vacuum, it would have been handy to have nearby. Also place for compressor would be one to think about.
I got my workbench from Küpper, to be exact from here. Pricing was pretty good, quality was good too, mostly metal parts. Get to build it yourself, but manual was on point. Lights had to be DIY’ed.
I also have a 4’ long power strip running along the back of my main workbench top just to make it easy to plug in things. Your BX 2.2 will be relegated to supporting away rides but the organizational possibilities of having pegboard and drawers at your disposal make it fun to geek out on the best way to set up your tools for your most common tasks and workflows. Don’t plan on nailing it off the bat, but rather continuously changing things around as you go and learn. I’ve had my setup for years, and still love rearranging things when I get a new tool and have to find a home for it.
And unless you true wheels regularly, a truing stand doesn’t have to occupy prime real estate on your workbench. I have mine on a shelf on the other side of the garage and just move it over to the bench when I need to use it.
I find myself constantly looking things up on the internet, or watching YouTube videos to research problems so I have a dedicated all-in-one computer on my bench (you can see it in the photo in my previous post). I built a simple computer stand so I could keep the wireless keyboard and mouse underneath and out of the way when I don’t need them.
It’s great that you’re building your bike workshop from a clean slate (I’m jealous). It will certainly be a rewarding experience and you’ll reap the benefits every time you work on your bike (or in my case, all of my friend’s bikes).
Shop mechanic here. A note about the bench vise and DT star ratchet removal. Try to find a vintage used vise. Availability varies depending on where in the world you are. I’m in the northeast US and there are often used vises in the classifieds for $100-$200. These vises are typically from the 1930’s - 1950’s when there was a lot of manufacturing in this area and they’re much more durable than anything you can find new in stores nowadays. They typically need to be wire-wheeled and cleaned up before use but it’s a fun project in itself. You’d have to spend well over $1,000 US to find anything comparable in a new vise.
In my experience, a bench vise isn’t the best way to remove DT ringnuts. I’ve witnessed a few horror shows by other mechanics. We typically place the wheel, with a tire installed on it, on the floor and against the edge of the workbench so the tire is making contact with the floor at the 6 o’clock position and the workbench at the 3 o’clock position. One person takes a wide stance and uses their body weight to press the wheel into the floor and workbench/doorway or other immovable vertical object, using traction to keep it from rotating. A second person uses a 24” or longer adjustable wrench or breaker bar to apply their body weight downward to rotate the ringnut tool. It’s much less strain on your back versus standing and twisting a wheel in the bench vise. It’s also safer if anything should suddenly break or fail. A smaller vise can flex open and allow the DT tool to rotate in the vise jaws and round over the wrench flats. I’ve ruined several expensive Elevation Wheel Company ringnut tools with the hex interface that fits a socket. My big Milwaukee impact gun or 40” breaker bar just rips the teeth off of the tool so I don’t recommend wasting your money on it. Bicycle Service Centre in the UK also makes a DT ringnut tool with a hex interface but I haven’t used one. We’ve gone back to using the DT branded ringnut tool with the square interface and turning it with a 24” adjustable wrench.
I’d think about how you will wash and dry your bikes, with a dedicated whole bike wash station and work stand and a parts cleaner. Then a bike and wheel store as these tend to accumulate and take up a lot of space unless hooked onto the ceiling.
Secondly, I prefer a double height pegboard and a narrow bench next to the work stand. That way you can reach tools without leaning over the bench and there is room to put stuff down while doing one job, but not so much room it gets cluttered with 10 work in progress tasks.
Completely agree with Greg Tolley above re used vices. I recently lucked into a Joplin* 4 and with half a day’s pleasant restoration work I have a vice the likes of which will never be made again.
Oh and last thing I converted to using polyester and merino rollers SWIX T18W WOOL ROTO BRUSH 100MM – Bumps and I am getting great results with much less mess. It seemed crazy to me to pay those prices in Australia for something made from Merino so I worked out how to make them for about $10 each.
*made in Sydney in the middle of last century, these were welded from steel plate rather than cast. Now hard to find.
I’ve occasionally thought about roto brushes, but given the prices and my limited usage here in Oz I haven’t gone there. If you could give us more info on making them - or want to sell some! - please let us know. Also, why merino???
Do you have access to a 3D printer? All you need to do is buy appropriate paint rollers, cut them to length and 3D print a couple of end caps to suit your Rotobrush: mine is 10mm hex which is I think the most common.
For XC skis you can get 3 wax rollers from one 230mm paint roller.
Why these fibres? It seems to me that the microfibre works as an applicator because it gets hot enough to transfer the wax into the base when spun at the recommended speed (1500 RPM). The merino appears to give a polish to the waxed base which seems to help with glide. I tried this in lots of conditions at Falls this year using plain old F4 and it performed very well and seemed to last for three days or so. I didn’t do the Hoppet this year so I can’t say whether it lasts the full 42k.
@ Pie: I see Kraftmeister’s showroom is in the Netherlands, so presume you are in Europe; I’ve never seen their stuff but it appears sorta similar to these guys’ gear…
bacsystems.com.au
…which I have both seen displayed and used. The BAC stuff is pretty bombproof, comes in a huge variety of sizes and is very configurable - highly recommended! I hope to buy some after I move next year. Also worth considering if you have a lot of stuff to store is a compactus; these can be acquired used.
As for the vice, these cannot be too precise or heavy duty. Either mount it to a solid bench or else a steel pedestal bolted to the floor - if it can move it will! Very handy for cold setting frames, removing recalcitrant BBs, seatposts, quill stems, cassettes or freewheels, etc.
I’d be inclined to keep the ski tuning stuff in its own “clean” area well away from any grease, oil, swarf, grit, sawdust, or other contaminants.
@ Mark: Thank you! I don’t have easy access to a 3D printer, but do have access to a lathe. Also, what length nap do you use for the microfibre rollers? (I’d assumed roto brushes were just for polishing untul I read Bumps’ description; it’s rare to see them used at Perisher.)
Unless you have to have the workbench all the same, consider doing the less enviromentally damaging thing of searching around for kitchen worktop offcuts. If you can’t find all the same colour, get creative.
My workbench uses two lots of kitchen worktop offcuts, in two colours, and it’s really useful seperating the workbench out into different levels as different jobs can benefit from being carried out at different heights, and it can help contain innevitable untidy (for me) ‘sprawl’.